Tag: OS X
OS X – Apache Web Sharing Starts But You Are Unable Connect
by nDarkness on Sep.06, 2010, under Mac OS X, Software
 In an effort to save you an afternoon of searching, I thought I would post this to help the OS X users having this issue. There are the usual causes of no content in the web root, firewall blocking requests, incorrect permissions and/or httpd.conf syntax errors. The one error that is a little tougher to track down is apache not being able to create log files. Check the line in the httpd.conf file that shows the path to apache’s log file. It should look something like this:
ErrorLog “/private/var/log/apache2/error_log”
Now if the directory apache2 does not exist in /private/var/log/, apache will fail to start without giving you much of an error message. To correct this, in terminal type:
sudo mkdir /private/var/log/apache2
Enter your admin password and restart apache either in System Preferences=>Sharing=>Web Sharing or in terminal by typing:
sudo apachectl restart
Once this is done, enter your web address in the web browser and you should see your pages load. Hope this helps!
Mac OS X – Update PHP, MySQL and Easily Add GD Support
by nDarkness on May.19, 2010, under Mac OS X, Software, Utilities
 If you have ever tried compiling the GD library on Mac OS X, you know that there are several issues to overcome before it is usable. Not to mention the version of PHP included with OS X wasn’t compiled with this option. In this post I will detail an easy method to update PHP, install MySQL and the GD library in just a few steps.
To start this process, we need to grab a couple of install packages from the links listed below:
- MySQL for your version of OS X.
- Marc Liyanage’s PHP Apache Module.
Once you have these packages downloaded, we can start by installing MySQL. Open the MySQL image and install the package by following the directions. When the install process finishes, copy the MySQL.prefPane to “your_user/Library/PreferencePanes”. Doing this allows you to start and stop the server from the system preferences window. Finally, make sure you take the time to secure your new installation.
If you had previously enabled the PHP module in the httpd.conf file, make sure you comment it back out.
Using the terminal from: Applications=>Utilities=>Terminal.app
(The following commands are entered without quotes.)
- First type: “vi /etc/apache2/httpd.conf”
- Find the PHP module:
LoadModule php5_module libexec/apache2/libphp5.so - Type: “i” and change the line to read:
#LoadModule php5_module libexec/apache2/libphp5.so - Now press the “esc” key, type “:wq” and press “enter”
The next step in this process is to install an updated version of PHP with GD support. The great thing about using the Entropy package, is that all of the hard work is already done for you! Open the installer and click the customize button if you don’t need all of the included extensions.
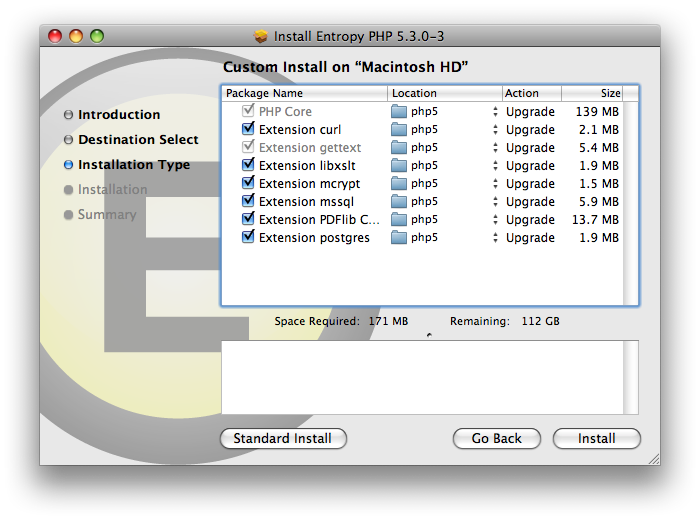
Once you have chosen the extensions you need, click install. When the install finishes, the last thing we need to do is edit the php.ini.
Using the terminal from: Applications=>Utilities=>Terminal.app
(The following commands are entered without quotes.)
- First type: “vi /usr/local/php5/lib/php.ini”
- Now type: “?mysql” and scroll up until you get to the lines that look like this:
mysql.default_socket = /tmp/mysql.sock
mysqli.default_socket = /tmp/mysql.sock - Type “i” and change them to:
mysql.default_socket = /var/mysql/mysql.sock
mysqli.default_socket = /var/mysql/mysql.sock - Finally press the “esc” key, type “:wq” and press “enter”
Now all you have to do is start Web Sharing from the system preferences window and all of your new features will be ready to use.
Apple’s Snow Leopard Bug Deletes All User Data
by nDarkness on Oct.12, 2009, under Mac OS X
 A bug has been reported on the Apple discussion boards and references a condition that causes all user data to be deleted.
The bug seems to be caused by a user that logs into a guest account only to find out when they log back into their account, all of their data is gone. The guest account, in OS X, by default deletes all user data when the user logs out.
Apple has yet to comment on this bug and so far the only fix is to restore the information from backup.
Until this issue is addressed and resolved, the only workaround is to disable the guest account in system preferences.
If anyone is brave enough to try this out, post back and let us all know the outcome.
MacBook/MacBook Pro Hibernation Modes
by nDarkness on Oct.09, 2009, under Mac OS X
As a power saving feature of most modern operating systems, you have the ability to save your current system state to ram, go into a power saving mode and consume very little battery power. This is a very convenient feature among portable computer users that are always on the go.
MacBooks have this feature enabled by default and there are three ways to activate it:
- close the lid
- press option+command+eject
- click the apple icon and select sleep
I prefer to save all of the battery life I can on my laptop when I won’t be using it for several days. Sleep mode works very well in accomplishing this goal but we can actually save virtually all of our battery power by using hibernation.
Hibernation will save the operating state to the hard drive and eliminates the need for power at all. This allows us to travel with our computer for several days at a time and not need to plug it up after that extended period to use it.
There are several methods available to activate hibernation mode in OS X. The first method is to put your laptop to sleep, unplug it and remove the battery. This will cause your laptop to enter hibernation mode and you will need to replace the battery and press the power button to wake it. I have a protective case for my laptop to protect it so this method is definitely out for me. The next method is to download one of the several available apps that will do the job for you. This is the easy method but requires no skill and very little effort on your part.
The method we will be using will require us to us the terminal and add a few lines to our .bash_profile file. Before we begin editing the file, lets talk about the command we will be using.
There are 5 different hibernation modes for the Mac. To find out which mode your computer is using, press command+<space bar> and type in terminal. Select the terminal program from the list and type:
pmset -g | grep hibernate
This is the output I received:
hibernatefile    /var/vm/sleepimage

hibernatemode    3
So what does all of this mean and how is this going to help us turn on hibernation? Below is a list of the different hibernation modes with explanations:
- 0 – Old style sleep mode, with RAM powered on while sleeping, safe sleep disabled, and super-fast wake.
- 1 – Hibernation mode, with RAM contents written to disk, system totally shut down while “sleeping,” and slower wake up, due to reading the contents of RAM off the hard drive.
- 3 – The default mode on machines introduced since about fall 2005. RAM is powered on while sleeping, but RAM contents are also written to disk before sleeping. In the event of total power loss, the system enters hibernation mode automatically.
- 5 – This is the same as mode 1, but it is for those using secure virtual memory (in System Preferences -> Security).
- 7 – This is the same as mode 3, but it is for those using secure virtual memory.
Now lets make the changes necessary to switch back and forth from our current mode to a new one. While still in terminal enter the following commands.
vi .bash_profile
Now add the following lines to this file:
alias hibernateon="sudo pmset -a hibernatemode 5; pmset -g | grep hibernate"

alias hibernateoff="sudo pmset -a hibernatemode 3; pmset -g | grep hibernate"
To exit this editor, press esc :wq enter. This will save the file with our changes and we will need to quit terminal and restart it again for our changes to take effect. Once we have restarted the terminal, type hibernateon, enter your password and now close your lid and your computer will enter hibernation mode automatically. To revert back from this new mode, open terminal again and type hibernateoff. This will return your computer to its original mode and the power saving features will work the way they did previously.