Archive for May, 2011
QuickBooks – Inventory Reorder System Part 1
by nDarkness on May.28, 2011, under Computers, Software, Utilities, Windows
QuickBooks is an exceptionally good and well known piece of accounting software. I have found that many things can be accomplished with QuickBooks if you are willing to think outside the box to get them done.
We all know that inventory is an important part of any business. It must be tracked and accounted for properly to ensure fluid day to day operations. We can train our staff and schedule customer service calls but if we don’t have the inventory on hand, we are stuck in a waiting game.
QuickBooks does not have a very good method to set-up reorder alerts at specific quantities. You are allowed to set a reorder point for specific items and view them in the Company Snapshot screen. Unfortunately we don’t know the specific quantity to order for each item or what the total cost of the order will be. So how do we add this ability? Why isn’t this feature included? We could purchase third party software to accomplish this task but who wants to spend additional money on a feature that really should be included.
In this three part series I will show you how to modify existing inventory items we want to track, customize a report of these items and filter the results to give us an easy to use inventory reorder list.
Our first goal in this process is to edit the existing inventory items that we need to track. These should be essential items that are used on a frequent basis. First open up the item list, Lists => Item List, and double click on the items that need to be modified. At the bottom of the Edit Item screen, you will notice a field labeled Reorder Point. This is what QuickBooks uses to trigger a reorder point in the Company Snapshot screen. You will need to enter the minimum quantity on hand that will prompt you to reorder.

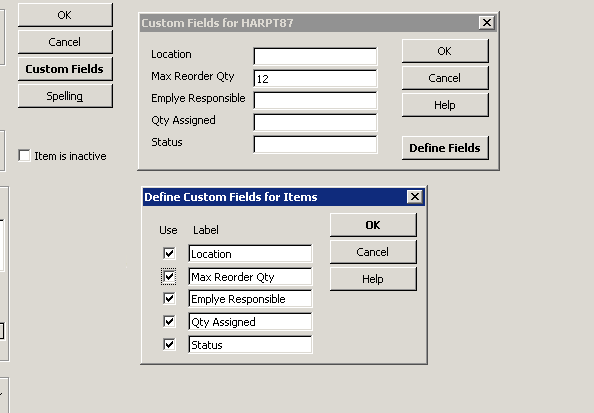
Now, lets setup a custom field to tell us how much of one item we wish to order. This will be the maximum quantity that we wish to have on hand. To do this we must be in single user mode if you work in a multi-user environment. Next we need to click on Custom Field => Define Fields and select an unused label. We will name this label Max Reorder Qty and make sure that the Use box is checked. The final thing left to do is enter the max quantity we wish to have on hand of the particular item and click OK for all screens.

Once you have finished setting up all of the items that you wish to track in your inventory list, we are ready to move on to the next part of our series. QuickBooks – Inventory Reorder System Part 2 – Setting up a custom reorder report.
QuickBooks – Inventory Reorder System Part 2
by nDarkness on May.28, 2011, under Computers, Software, Utilities, Windows
[Set up Items Part 1][Export to Excel Part 3]
In part one of our inventory reorder system series, we learned how to set our items up to have reorder points and max reorder quantities. Now we need be able to generate a report so that we know what needs to be reorder and how many we need to order.
To begin this process we will open the item list, Lists => Item List and click on Reports => Item Listing at the bottom of the page.

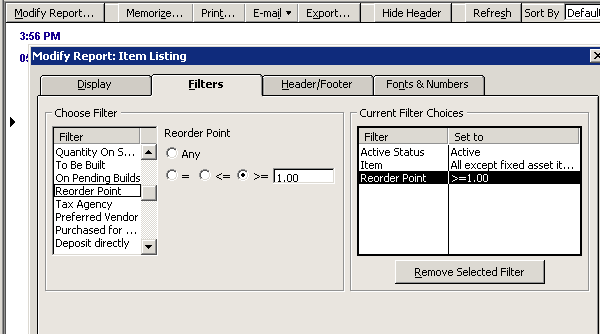
This will bring up a list of all the items in our inventory list. We will probably not need all of these parts, so we need to filter the results to give us just the items with reorder points set. To do this click on Modify Report => Filters and select Reorder Point. Now select the option for >= and add a 1 in the text field.

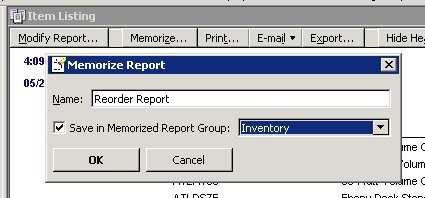
Next we need to click on the Display tab and remove several colums. The columns to remove are price, sales tax code and preferred vendor from the custom report. Now we need to memorize the report so that we don’t have to make these changes again. To do this click on Memorize Report, name it Reorder Report and save it in the inventory group of the memorized reports.

Now that we have finished this step, we are ready to move on to our final part in the inventory reorder system series. QuickBooks – Inventory Reorder System Part 3.
QuickBooks – Inventory Reorder System Part 3
by nDarkness on May.28, 2011, under Computers, Software, Utilities, Windows
[Set up Items Part 1][Generate Report Part 2]
In the first two parts of our series, we determined that QuickBooks does not have an all-in-one function to give you a report on items that need to be reordered. Because of this deficiency, we have developed a system to generate a list in QuickBooks, export it to Excel and extract the information we need.
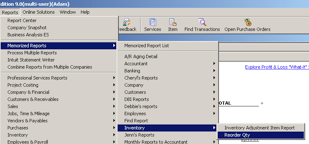
To generate this report, click on Reports => Memorized Reports => Inventory => Reorder Report.

This will bring up an item listing report that has been previously setup and formatted. This will take care of the QuickBooks side of this process and all that needs to be done now is export the report to Excel and make a few formatting changes.
(Please note that these instructions were written for Office 2003. If anyone needs instructions for Office 2007, please let me know and I will post them.)
The first change is to shorten header columns for printing purposes. To allow us to shorten the header columns click on Edit => Replace or press Ctrl+H. This will allow you to find and replace words in an Excel document. The words we want to replace are quantity with Qty, sales order with SO and purchase order with PO. The next step is to select all of blank column A and delete it. Now select columns F-J and click on Format => Columns => AutoFit Selection.
Now we need to add two column headers, one for Reorder Qty and one for Total Cost. Once this is finished your sheet should look similar to the one below.

With the formatting out of the way we are ready to enter the formula for the reorder quantity column. Under the Reorder Qty column, J in this example, on the row below the header, enter the following formula:
=IF(I2-G2-F2+E2=0,"",IF(H2="","",IF(G2<=H2,I2-G2-F2+E2,"")))
The first part of this formula checks to see if the max reorder quantity minus the quantity on hand minus the quantity on order plus the quantity on sales order equals zero. If it does, that means we have enough on order and there is no need to order more. If H2 is blank don’t add it into the equation either. If the quantity on hand is not less than or equal to zero then we subtract the same rows again and enter the result into our spreadsheet.
The total cost column formula will be much easier to type. All we need to do is multiply the reorder quantity by the cost column to get the total amount. In this example the formula looks like this:
=J2*D2
With the formulas entered, copy them down to the last row and we are ready to sort the spreadsheet. Select the reorder quantity header and click Data => Filter => AutoFilter. Now you will notice drop down selection boxes for each of the column headers. Click on the drop down box for the Reorder Point column and select nonblanks. Repeat this step for the reorder quantity column. You should end up with something similar to the picture below.

To total the Total Cost column, we need to insert a sumif formula that will do the work for us. In our example it would look something similar to what you see below.
=SUMIF(J214:J4380,">0",K214:K4380)
This basically says that we need to sum all of column K if the cells in column J are greater than 0. This formula will vary greatly with each report that is extracted from QuickBooks.
The only steps remaining are to format and print the report and use it to order the items. Using this report along with proper tracking of the inventory on hand will make the ordering process much easier. Feel free to let me know if you have any issues.
WordPress Android App – No Blog for That Account
by nDarkness on May.17, 2011, under Android, Cell Phones, Sprint, Verizon, Wordpress
 I have been trying for a few hours to get the Android WordPress app working with very little success. The only error I was given after trying to log in was, No blog for that account. After doing several searches and not really getting anywhere, I decided to check my wp-config.php.
I run WordPress in a multisite environment with several other bloggers. Upon inspection of my config file, I discovered that the BLOG_ID_CURRENT_SITE and SITE_ID_CURRENT_SITE was set to 2 instead of 1. I changed the id back, tried logging in again and VIOLA! I was able to connect and browse all of the other blogs in my network as well. Hopefully this will help someone else out that is having a similar problem.
Sony – What Should They Do To Keep Your Business?
by nDarkness on May.16, 2011, under Computer Security, Consoles, Gaming, Privacy, PS3, PSN
 Sony has made a pretty big name for themselves recently by exposing their trusting customer’s confidential information. As details continue to emerge, it’s pretty obvious that Sony is the only one to blame. By taking a lackadaisical approach to network security, their customers are having to pay the price.
- If the shoes were switched and you were one of the Sony board members, what would you do to ensure your customers that the same mistakes won’t be repeated?
- How do you “make it up” to them for the mistake?
- Is Sony’s only saving grace their seemingly endless checkbook?
- How many of you will never do business with Sony again?