Windows
QuickBooks – Inventory Reorder System Part 1
by nDarkness on May.28, 2011, under Computers, Software, Utilities, Windows
QuickBooks is an exceptionally good and well known piece of accounting software. I have found that many things can be accomplished with QuickBooks if you are willing to think outside the box to get them done.
We all know that inventory is an important part of any business. It must be tracked and accounted for properly to ensure fluid day to day operations. We can train our staff and schedule customer service calls but if we don’t have the inventory on hand, we are stuck in a waiting game.
QuickBooks does not have a very good method to set-up reorder alerts at specific quantities. You are allowed to set a reorder point for specific items and view them in the Company Snapshot screen. Unfortunately we don’t know the specific quantity to order for each item or what the total cost of the order will be. So how do we add this ability? Why isn’t this feature included? We could purchase third party software to accomplish this task but who wants to spend additional money on a feature that really should be included.
In this three part series I will show you how to modify existing inventory items we want to track, customize a report of these items and filter the results to give us an easy to use inventory reorder list.
Our first goal in this process is to edit the existing inventory items that we need to track. These should be essential items that are used on a frequent basis. First open up the item list, Lists => Item List, and double click on the items that need to be modified. At the bottom of the Edit Item screen, you will notice a field labeled Reorder Point. This is what QuickBooks uses to trigger a reorder point in the Company Snapshot screen. You will need to enter the minimum quantity on hand that will prompt you to reorder.

Now, lets setup a custom field to tell us how much of one item we wish to order. This will be the maximum quantity that we wish to have on hand. To do this we must be in single user mode if you work in a multi-user environment. Next we need to click on Custom Field => Define Fields and select an unused label. We will name this label Max Reorder Qty and make sure that the Use box is checked. The final thing left to do is enter the max quantity we wish to have on hand of the particular item and click OK for all screens.

Once you have finished setting up all of the items that you wish to track in your inventory list, we are ready to move on to the next part of our series. QuickBooks – Inventory Reorder System Part 2 – Setting up a custom reorder report.
QuickBooks – Inventory Reorder System Part 2
by nDarkness on May.28, 2011, under Computers, Software, Utilities, Windows
[Set up Items Part 1][Export to Excel Part 3]
In part one of our inventory reorder system series, we learned how to set our items up to have reorder points and max reorder quantities. Now we need be able to generate a report so that we know what needs to be reorder and how many we need to order.
To begin this process we will open the item list, Lists => Item List and click on Reports => Item Listing at the bottom of the page.

This will bring up a list of all the items in our inventory list. We will probably not need all of these parts, so we need to filter the results to give us just the items with reorder points set. To do this click on Modify Report => Filters and select Reorder Point. Now select the option for >= and add a 1 in the text field.

Next we need to click on the Display tab and remove several colums. The columns to remove are price, sales tax code and preferred vendor from the custom report. Now we need to memorize the report so that we don’t have to make these changes again. To do this click on Memorize Report, name it Reorder Report and save it in the inventory group of the memorized reports.

Now that we have finished this step, we are ready to move on to our final part in the inventory reorder system series. QuickBooks – Inventory Reorder System Part 3.
QuickBooks – Inventory Reorder System Part 3
by nDarkness on May.28, 2011, under Computers, Software, Utilities, Windows
[Set up Items Part 1][Generate Report Part 2]
In the first two parts of our series, we determined that QuickBooks does not have an all-in-one function to give you a report on items that need to be reordered. Because of this deficiency, we have developed a system to generate a list in QuickBooks, export it to Excel and extract the information we need.
To generate this report, click on Reports => Memorized Reports => Inventory => Reorder Report.

This will bring up an item listing report that has been previously setup and formatted. This will take care of the QuickBooks side of this process and all that needs to be done now is export the report to Excel and make a few formatting changes.
(Please note that these instructions were written for Office 2003. If anyone needs instructions for Office 2007, please let me know and I will post them.)
The first change is to shorten header columns for printing purposes. To allow us to shorten the header columns click on Edit => Replace or press Ctrl+H. This will allow you to find and replace words in an Excel document. The words we want to replace are quantity with Qty, sales order with SO and purchase order with PO. The next step is to select all of blank column A and delete it. Now select columns F-J and click on Format => Columns => AutoFit Selection.
Now we need to add two column headers, one for Reorder Qty and one for Total Cost. Once this is finished your sheet should look similar to the one below.

With the formatting out of the way we are ready to enter the formula for the reorder quantity column. Under the Reorder Qty column, J in this example, on the row below the header, enter the following formula:
=IF(I2-G2-F2+E2=0,"",IF(H2="","",IF(G2<=H2,I2-G2-F2+E2,"")))
The first part of this formula checks to see if the max reorder quantity minus the quantity on hand minus the quantity on order plus the quantity on sales order equals zero. If it does, that means we have enough on order and there is no need to order more. If H2 is blank don’t add it into the equation either. If the quantity on hand is not less than or equal to zero then we subtract the same rows again and enter the result into our spreadsheet.
The total cost column formula will be much easier to type. All we need to do is multiply the reorder quantity by the cost column to get the total amount. In this example the formula looks like this:
=J2*D2
With the formulas entered, copy them down to the last row and we are ready to sort the spreadsheet. Select the reorder quantity header and click Data => Filter => AutoFilter. Now you will notice drop down selection boxes for each of the column headers. Click on the drop down box for the Reorder Point column and select nonblanks. Repeat this step for the reorder quantity column. You should end up with something similar to the picture below.

To total the Total Cost column, we need to insert a sumif formula that will do the work for us. In our example it would look something similar to what you see below.
=SUMIF(J214:J4380,">0",K214:K4380)
This basically says that we need to sum all of column K if the cells in column J are greater than 0. This formula will vary greatly with each report that is extracted from QuickBooks.
The only steps remaining are to format and print the report and use it to order the items. Using this report along with proper tracking of the inventory on hand will make the ordering process much easier. Feel free to let me know if you have any issues.
Intuit QuickBooks Discount Error Goes Unfixed
by nDarkness on May.06, 2010, under Mac OS X, Software, Utilities, Windows
 Unless you live in a secluded cave in the middle of nowhere, you have undoubtedly heard of a little program called QuickBooks by Intuit. This program comes in a variety of different flavors to suit your personal and/or business needs. This software can be surprisingly simple to use with little to no effort.
In a few cases when I invoice a customer, I will charge them for a product at full price and then a few lines down discount the product to the agreed upon selling price. This helps me to demonstrate the value associated with the services I provide and also allows me to charge more later if the circumstances change. QuickBooks has a special item that is setup for this very discount function.
During my normal day-to-day operations, I received a phone call from a customer that was unable to determine how I arrived at a sales tax figure. Thinking this was a simple error on the customer’s behalf I pulled up the invoice, ran the figures and was shocked when I realized that the math absolutely did not work. Wanting to get to the bottom of this, I asked to call the customer back and began trying to figure the problem out. After working with the problem for a few moments I remembered that my company has a full service plan and decided to call Intuit to report the problem. After jumping through several hoops and being transferred to a level 2 support member, I was told that this was expected behavior. The invoice in question had taxable and non-taxable items on it with the discount appearing at the very bottom of the invoice. She explained that the QuickBooks calculator added all the items up as it went along and when it encountered a discount it treated it as a payment and reduced the previous line items by a percentage.
Let see an example:
Our tax amount will be 8%.
Now we have an item that costs $1 and is taxable: $1 x 8% = $1.08
Another item for $1 that is not taxable: $1 x 0% = $1
A discount of $1 that is also taxable: $1.08 + $1 = 2.08 – $1.08 = $1
Now here is a screen shot from QuickBooks with the same problem:
(Click to enlarge)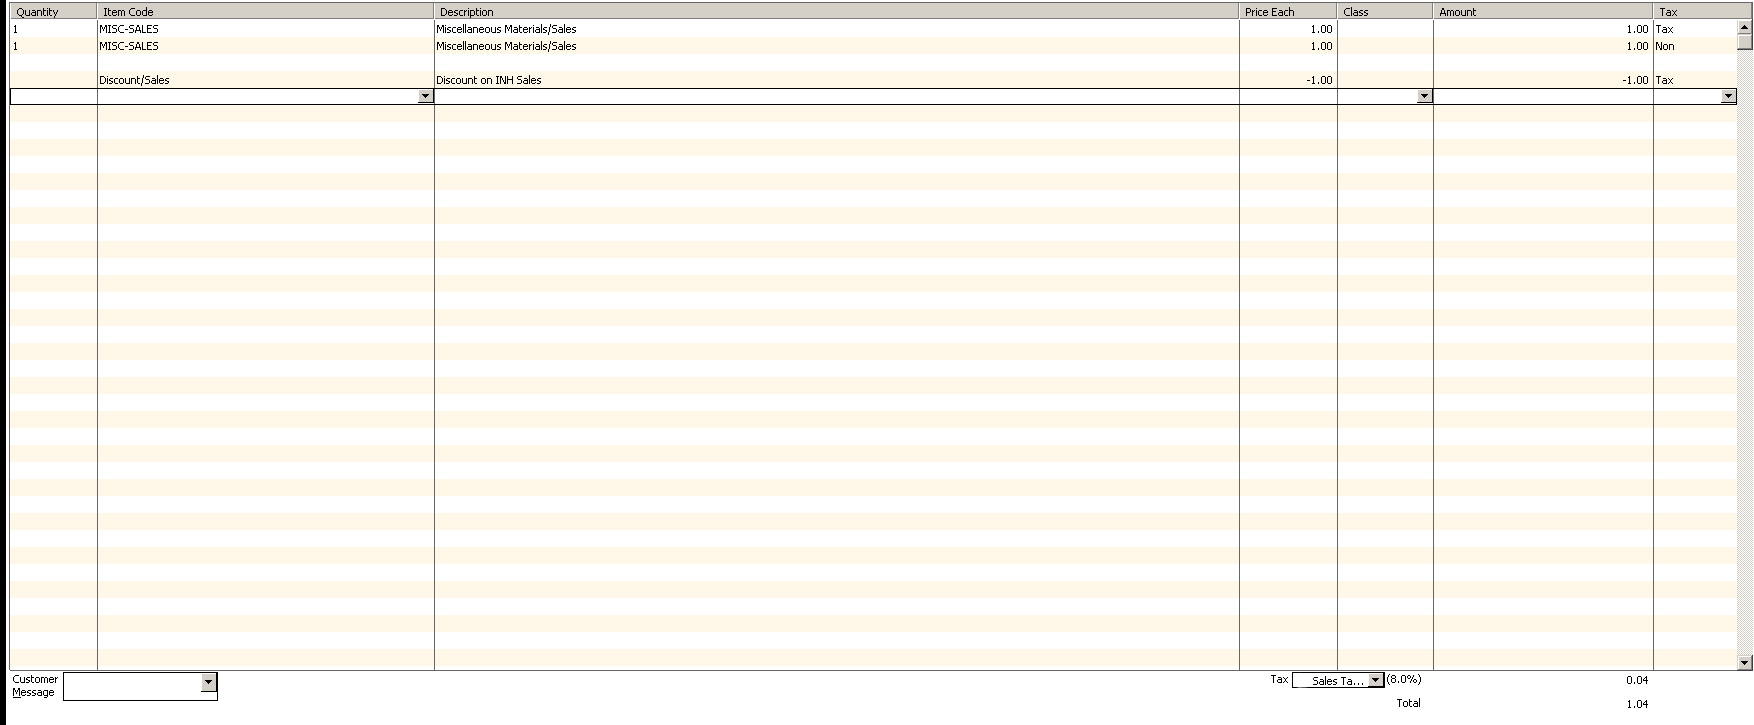
As you can see, QuickBooks manages to figure this total to be $1.04. She then explained that the work around to this problem was to add all of the taxable items first, then use the taxable discount and finally add the non-taxable items and a non-taxable discount if needed. I asked if this was going to be improved and was told that I could submit this as a suggestion for a future version as an improvement.
This just goes to show you that you can’t always trust shiny software even if you pay for it and you should always double check your math.
Windows XP Roaming Profile Synchronization Issues
by nDarkness on Nov.09, 2009, under Windows
Roaming profiles allow us to access files that we often use on any computer joined to the network, easily replace old computers, and provide greater network security. There are on occasion, special circumstances that cause the log-on/log-off synchronization process of these profiles to fail. Generally when this happens the icon pictured fourth from the left below will appear in the task bar.
![]()
This causes your roaming profile to refuse to load or breaks NetBIOS connections even after a reboot of the system. You are still able to connect to network shares if you use the ip address of the network computer(s). To correct this problem, go to My Computer=>Tools=>Folder Options=>Offline Files. This will open the screen pictured below.

Now what you need to do is hold down Ctrl+Shift and click on Delete Files. Answer yes to the confirmation prompt, click ok and then restart your computer. After the restart, you will find that your profile loads normally and there are no more connection issues involving NetBIOS names.
Windows XP – Reclaim Lost Hard Drive Space
by nDarkness on Nov.07, 2009, under Windows
The network I administer at work has an even mix of new and old computers. The problem with the older computers are the small hard drives and low amount of memory. I constantly have employees telling me that their computers are running slower than normal and that they are getting low resources error messages.
Below are the steps I use to free up space on these machines:
- Click Start => My Computer
- Now we want to right click on the drive that Windows is installed on and click on Properties.
- Once the properties dialog opens, click on Disk Cleanup. (This will take a few seconds to minutes to load)
The next steps require a little more explanation.
Before we use Disk Cleanup to get rid of any files, let’s click on the more options tab. This tab allows us to remove components, installed programs that we don’t use and old system restore points. Assuming you have system restore enabled, which by default it is, you will be able to regain a considerable amount of space by selecting this option.
Look at the amount of free space you have and remember the number. Now click on the Clean Up button for System Restore and answer yes to the prompt. You will not see any progress bar or get confirmation that this operation has completed. Wait about 10 seconds and view your free space again. Did the number change? When I did this on my computer I regained a little over 3 gigs!
Now click back on the Disk Cleanup tab. This tab gives us a list of file types with the amount of space they take up plus their descriptions down below. Click on each one to find out what they do to help you decide if you should delete them or not. I typically delete everything except for Office setup files and I don’t compress old files. Once you have the files you want to remove selected click on ok and answer yes to the prompt.
That’s pretty much sums up the process I use to reclaim drive space on Windows XP machines.
Microsoft Exchange Recovery Mode and How to Fix it
by nDarkness on Nov.06, 2009, under Windows
I had a user this week that was experiencing trouble with Outlook. Every time they opened the program they received a prompt similar to the one below.
-
Exchange is currently in recovery mode. You can either connect to your Exchange server using the network, work offline, or cancel this logon.
Not only was the prompt annoying, the shared calendar and contacts crashed the program whenever you tried to access them.
After doing some digging I found a solution that fixed the problem.
- Start Outlook and select Connect.
- On the Tools menu, click E-mail Accounts.
- Click View or change existing e-mail accounts, and then click Next.
- Click the Microsoft Exchange Server account, and then click Change.
- Click More Settings, and then click Advanced.
- Clear the Use Cached Exchange Mode check box, and then click Apply.
- Instead of exiting Outlook at this point click Offline Folder File Settings, and then click Disable Offline Use.
- Click Yes to the prompt, OK, Next, and Finish
- Close Outlook and start it again.
- Repeat steps 1-5
- Now reselect the Use Cached Exchange Mode check box, exit, and then restart Outlook.
That’s it now Outlook will no longer give the prompt and everything will be back to normal.
Quickly Rename Folders and Files in Windows for Free
by nDarkness on Oct.13, 2009, under Utilities, Windows
 Have you ever needed to rename a bulk quantity of files and/or folders? In my day to day life, I use template folder structures to contain various aspects of job information. Before these folders are usable, I must add a unique job name to the beginning of the folder and/or file name to make searching easier. This renaming task can quickly become very tedious and time consuming.
Thanks to Denis Kozlov over at [den4b] there is a solution that saves loads of time and effort. The program is called, ReNamer and it allows us to select a list of files and/or folders and perform various renaming operations on them.
Since the task at hand is to work on already designed folder structures, all I need to do is find a method that does the job and save the preset for the different types folder structures. I chose to use a delete rule to remove the generic job name and then an insert rule to insert a unique job name.
After going through a few short test runs, I came up with a working solution that I was able to
save, customize and slightly change to suit other needs.
If you have similar renaming needs, check out this
program and I’m sure you will agree it is definitely worth your time.
Flash Cookies and What You Don’t Know
by nDarkness on Oct.10, 2009, under Computer Security, Linux, Mac OS X, Privacy, Windows
 If you have been browsing the internet for any period of time, I’m sure you have heard of cookies. Even though you may not be entirely sure what they do, you certainly know how to delete them. Right?
Cookies are files websites save on your computer that contain information about you. There are several legitimate purposes for these files such as remembering your login information so you don’t have to sign in every time you visit a site, keeping up with cart information as you shop online and in some cases online security such as banking sites.
With the good also comes the bad. A quick search on Google for tracking cookies will return page after page of articles on this topic. A tracking cookie will monitor your movement around the internet and will phone home to let its authors know what you are doing online. With this information they will taylor their advertising on affiliate sites so that you only get ads for what they believe interests you or they will sale this information to other advertisers.
“So what’s the big deal? My browser is set up to delete cookies at regular intervals and I don’t allow them from third party sites.”
Well here is a little fact that you may not know. The same technology that powers streaming video, online games, and animated movies, has the ability to set these cookies as well. The technology I am referring to is the flash plugin, currently developed by Adobe. These “special” cookies are not created or treated the same way as the cookies that we have all come to know and love. In fact your browser has, on its own, no control over these cookies at all.
To illustrate this point, clear your browser cookies and then take a look in the following location(s):
- Windows: Under your current user’s Application Data directory, click on Macromedia\Flash Player\#SharedObjects and Macromedia\Flash Player\macromedia.com\support\flashplayer\sys.
- Mac OS X: ~/Library/Preferences/Macromedia/Flash Player/#SharedObjects/[package ID of your app]/ and ~/Library/Preferences/Macromedia/Flash Player/macromedia.com/support/flashplayer/sys/
- GNU-Linux: ~/.macromedia
Using your browser to clear cookies had no effect whatsoever on the flash cookies. That possibly and probably means that your actions are still being tracked as you surf the net. What’s more, flash cookies have the ability to restore the normal cookies that your browser just deleted.
“So what can I do about these cookies? You said earlier that my browser on its own could not delete these cookies, what does that mean?”
A developer going by the name of NettiCat, has developed an addon for Firefox called Better Privacy that will do the dirty work for you. This addon allows you to clear these cookies when you open or close your browser, at regular intervals and manually.
Now feel free to go trash those stale cookies and be on the lookout for them popping up again.